Hey there, if you’re reading this, you probably just unboxed a set of modular lab chairs and are staring at a pile of parts thinking, “Wait, how do all these go together?” Or maybe you’re a lab manager who’s tried to put together non-modular chairs before and ended up with wobbly seats and extra screws. Trust me, I’ve been there. I’m part of the team that ships these chairs out to schools, research labs, and biotech facilities all over—so I’ve seen every chaos of a botched chair installation, and today I’m breaking down exactly how to get your modular lab chairs up and running in no time, no fancy tools required. Lab Chair
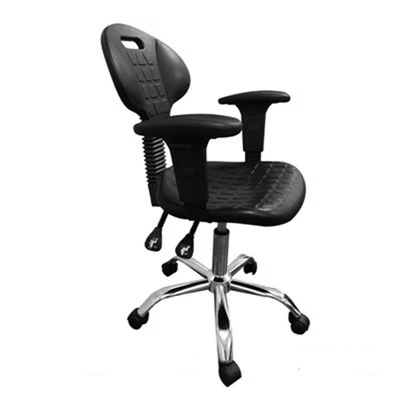
First off, let’s talk about why modular lab chairs are such a game-changer. Unlike those old one-size-fits-all chairs that you have to haul in a whole piece and pray it fits through your lab door, modular ones come in pieces—seat, backrest, armrests, gas lift, base, wheels, maybe even a tray attachment if you need it for lab gear. That means they fit through narrow lab hallways, elevator doors, even tight corners by fume hoods. But that modular design also means you gotta follow the right steps, or you’ll end up with a chair that sags after a week or won’t adjust like it’s supposed to. I’ve seen a lab order 20 modular chairs, rush putting them together, and by day three half the armrests were falling off. Don’t be that lab. Let’s start with the prep work, because this is where most people skip ahead and mess up.
Before you even touch a screwdriver, lay out all the parts. Grab a big table (or even the floor, just clear off a space—lab floors get dirty quick, so maybe put down a cardboard box first to keep parts clean). Dump everything out of the box, and sort them into piles. Here’s what you should have: the base (that round metal thing with the stem in the middle), 5 casters (modular chairs almost always use 5-point bases for stability), the gas lift cylinder (that tall plastic/metal piece that connects the base to the seat), the seat pan, backrest, whatever adjustable parts you got—armrests, tilt knobs, maybe a foot ring if it’s a taller chair. Also, pull out the hardware bag: screws, Allen wrenches (usually a 4mm or 5mm, that’s standard for most of these), maybe a rubber mallet, and don’t forget the instruction sheet (I know, I know, everyone ignores those, but keep it handy for reference).
Wait, one quick tip here: check all the parts for damage before you start. It’s way easier to notice a cracked backrest or a missing caster now than when you’re 20 minutes into building the first chair and realize you have to stop and send a replacement. I always tell clients to do this first—we’d rather hear about a missing part on day one than day five when you’re already halfway done. Also, make sure you have the right tools. Most of these chairs only need an Allen wrench, but if your casters are the screw-in kind instead of the push-in, you might need a screwdriver. No power tools required, promise.
Next step: put the casters on the base. This is probably the easiest part, but also where people mess up if they rush. There are two types of casters: push-in and screw-in. Push-in are the most common for our chairs—you just line up the caster stem with the hole in the base, and give it a firm push until it clicks. No need for a mallet, just a good solid push. If you hear a click, you’re good. If it wiggles after, pull it out and try again—don’t force it, you’ll crack the plastic caster or the base hole. Screw-in casters are just as easy: line them up with the base holes, twist clockwise until they’re tight. Don’t over-tighten, though—you’ll strip the thread, and that’s a pain to fix. One thing I always mention: make sure all casters face the same direction? Wait, no, actually, for most modular lab chairs, the direction doesn’t matter for stability, but it helps if they’re all pointing the same way so they roll smoothly across your lab floor (whether it’s tile, epoxy, or vinyl). I once had a lab that put two casters facing opposite directions, and their chairs kept getting stuck in the tiles. Oops.
Once your base is all rolled up with casters, it’s time to attach the gas lift. This is super straightforward. The gas lift has a wide end and a narrow end. The narrow end goes into the base’s center opening—just push it down until it’s seated all the way. Then the wide end of the gas lift connects to the seat pan. Wait, hold on—don’t attach the seat pan yet? Wait no, actually, let’s get that right. Some people attach the gas lift to the seat first, then connect it to the base. Either way works, but I prefer attaching it to the base first because the base is on the floor, so it’s more stable. Just line the narrow end of the gas lift up with the base’s center hole, push down firmly, and you’re done. No tools needed here, that’s how the pressure fit works.
Now the part where you attach the seat and backrest to the gas lift. This is where the modularity really shines, because most of these have quick-connect systems, not a bunch of screws. Wait, our chairs—we designed them so the seat pan has a slot on the bottom that slides right over the top of the gas lift, and then there’s a little lever under the seat that locks it in place. Just slide it on until you hear a click, then test it by wiggling the seat a little. If it doesn’t move, you’re good. If it does, you probably didn’t slide it all the way, or the lock lever isn’t engaged. Easy fix.
Next, the backrest. Okay, here’s where some people get confused. The backrest connects to the back of the seat pan, right? Most modular designs use either a pair of screws or a quick-connect hinge. For our chairs, we use the quick-connect hinge because it’s way faster and no one wants to mess with tiny screws when they’re building a bunch of chairs. Just line up the two hinge pieces on the backrest with the two holes on the back of the seat, push them together, and then there’s a pin or a plastic clip that you push in to lock it. If you do have screws, just align the backrest with the seat’s back mounts, hand-tighten the screws first, then use the Allen wrench to snug them up—don’t over-tighten, you’ll strip the plastic mounts, and that’s a replacement part you don’t want to buy. Also, make sure the backrest is facing the right way—obviously, the curved part is supposed to be against your back, not sticking out. I’ve seen that happen once, and it was pretty funny until the lab had to take the whole thing apart and flip it.
Now, add the extra modules if you have them—armrests, adjustable lumbar supports, foot rings, tray holders. Let’s do armrests first, since those are common. Most armrests attach to the sides of the seat pan, usually with two screws per armrest. Again, hand-tighten first, then snug them up, don’t crank them. If you have adjustable armrests that go up and down, there’s usually a small lever or a pin you have to adjust while tightening, just make sure it moves smoothly so you can adjust later. Foot rings: if your chair has one, it attaches to the bottom of the base’s stem, below the gas lift. Just line it up with the threads on the stem, twist clockwise until it’s tight. Easy. Tray holders? Those usually snap onto the seat or the backrest, same as the casters—just push until they click.
Wait, hold on—adjustable features! Modular lab chairs are called modular for a reason, right? They’re supposed to adjust to different people, not just fit one size. So after you build the chair, you gotta test the adjustments. The tilt function—usually a lever under the seat that lets you lean back, or locks the seat in place. Gas lift height adjustment: there’s another lever under the seat that you push up or down to raise or lower the chair. Make sure that works—if it sticks, double check that the gas lift is seated all the way, or that there’s no crumb or dirt in the lever mechanism (labs get messy, that’s normal). Armrest adjustments, if you have them, move them up and down, side to side, make sure they don’t wobble. If something doesn’t adjust smoothly, don’t force it—loosen the part a little, check for debris, tighten it back up. I’ve had labs ask me why their chair won’t go up, and it’s just a tiny piece of lab dust in the lever. Easy fix.
Now, a few pro tips from the team that sells these chairs, stuff we’ve learned from thousands of installations. First, if you’re building multiple chairs at once, label the parts as you go. We put little stickers on each part (seat 1, backrest 1, etc.) when we pack them, but if you lose those, just pair parts as you take them out. It’s easy to mix up a seat and backrest when you’re building 10 chairs. Second, build the chairs on a flat surface if you can. If you build them on a sloped lab floor, they might wobble once you put them in their permanent spot. Test each chair for wobbliness before you roll it to its spot—just sit on it gently (wait, is that safe? Yeah, once it’s all built, a quick test sit is fine) and rock back and forth. If it wobbles, check all the casters to make sure they’re seated all the way, and check the base connections. Third, keep the hardware bag for future repairs. We get tons of calls from labs that lost a screw for an armrest, and they have to order a new one. Stash the extra screws and Allen wrench somewhere in your lab supply cabinet, you’ll thank me later.
Wait, what about if something goes wrong? Like, the caster falls off a week later, or the backrest is loose. Don’t panic. Most issues are easy fixes. If a caster falls off, just push it back in firmly, it should click into place. If the backrest is wobbly, check the screws (if you used screws) and tighten them a little. If the seat won’t adjust height, make sure there’s no debris in the lever—blow on it or wipe it with a cloth, that usually works. If you have a bigger issue, that’s why we’re here. We don’t do phone trees or automated replies—our team is actual lab chair people, we know what lab life is like, we know you don’t have time to mess with broken chairs.
At the end of the day, installing modular lab chairs isn’t rocket science. The key is prep, take your time, don’t force parts, and test every step as you go. We designed these chairs to be easy to put together, no matter how handy you are. Whether you’re building one chair for a small office or 50 for a whole new lab, following these steps will save you hours of frustration, and you’ll have chairs that last for years, even with all the spills and daily use labs get.

If you’re looking to order modular lab chairs for your space, or you need more tips on customizing them for your specific lab (whether that’s a fume hood area, a clean room, or a cell culture lab), reach out to our team. We can walk you through any step of installation, help you pick the right modules for your needs, and make sure you get chairs that work for your team. Don’t waste time with chairs that are a pain to build or don’t fit your space—modular lab chairs are meant to make lab life easier, starting with the installation.
Cleanroom Chair Reference:
Ergonomics Institute. (2022). Modular Seating Installation Guide for Laboratory Settings. Global Lab Supply Research.
Occupational Safety and Health Administration (OSHA). (2021). Ergonomic Workstation Setup for Lab Workers. U.S. Department of Labor.
Laboratory Furniture Manufacturers Association (LFMA). (2023). Best Practices for Modular Lab Chair Assembly and Maintenance. LFMA Technical Bulletin.
Mingqi Anti-Static Technology (Dongguan) Co., Ltd.
Mingqi Anti-Static Technology (Dongguan) Co., Ltd. is one of the most professional lab chair manufacturers and suppliers in China, featured by quality products and good price. Welcome to buy durable lab chair for sale here and get quotation from our factory. We also accept customized orders.
Address: Room 103, Building 2, No.5, Chuangye Road, Gaobu Town, Dongguan City, Guangdong Province
E-mail: qiuhaiyang94@gmail.com
WebSite: https://www.mingqiesdchair.com/
